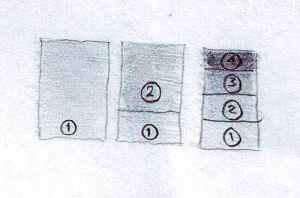
My sister shading with the principles of the layer or layers. First, my sister will give shading gently (don't pressing a pencil hard) to all areas with average terarsir. To get a value that is darker, my sister gave shading again on it. Sort of piling layers. The more layers are stacked, the resulting shading may become darker.
Here the example of making shading on the paper

In the picture above, shading with a layer indicated by the number 1, two layers indicated by the number 2, and so on.
The last tips, namely the direction of hatching. Shade the appropriate direction of the object shape. With so shaded that there will be more realistic. For example, see picture below.

Picture on the right is more realistic look right?
These tips can be applied when shading the face or body. For example, in the eye as in the picture below.
Finally, all of the above trick will not work if you use the wrong paper. The paper of various kinds. Each type has a different surface. There are rough, there are subtle. There are suitable for pencil, there are more suitable for watercolor. Therefore, knowledge and experience using various kinds of paper is very important. Choose the right type of paper and you will produce a great painting!
0 Response to "How to shade the picture"